Welcome to my stop on the Windham Fabrics Christmas in July blog hop! I know, it's hard to think about Christmas when it is so HOT outside, amiright? But if you're like me, you always have grand plans to make handmade gifts for the holidays and then December is here before you know it and you are thanking your lucky stars for Amazon prime a few days before gift-giving time. But this year, we're on top of things! (Pssst...Keep reading to the end of this post to find out how you can win the fabric used on this stop of the blog hop!)

Ok, let's be realistic. Even if you do wait until the last minute again, I'm sharing a super quick and easy project that you can make with items you already have around your house: a no-sew Christmas wreath ornament. These are great to use as decorations, or make several to give as gifts! This project is quick, easy and pretty darn cute. So without further ado...
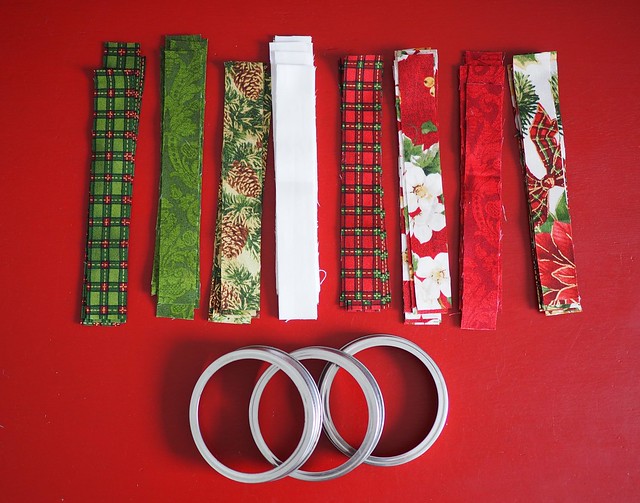
Step 1. Gather supplies and cut your fabric. You need two things for this project: a small round shape and fabric. I used wide-mouth mason jar lids because they are cheap and I already had some on hand, but you could use a small embroidery hoop or something similar. [You can also make your own round shapes with pipe cleaners or a wire clothing hanger.] Cut your fabric into strips measuring about 1 inch by 7 inches long. It doesn't need to be precise (isn't this project getting better and better?!). I recommend at least 35 strips for a 3.5 inch mason jar lid.

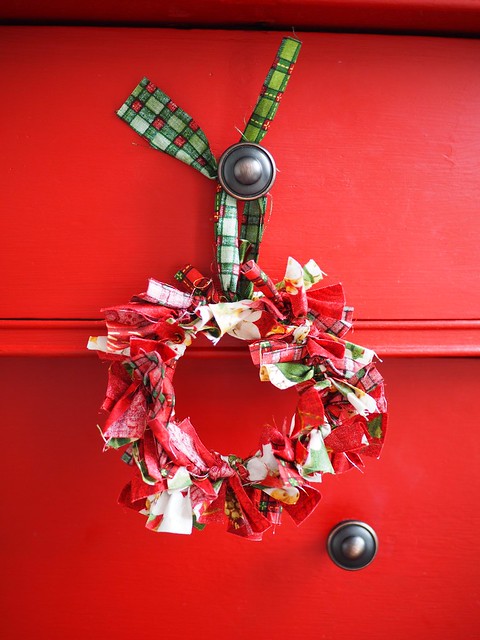
Step 2. Take one strip of fabric and tie a double knot around your hoop. Continue adding and tying fabrics until you have filled the hoop.


No-Sew Christmas Wreath Ornament Tutorial
Step 1. Gather supplies and cut your fabric. You need two things for this project: a small round shape and fabric. I used wide-mouth mason jar lids because they are cheap and I already had some on hand, but you could use a small embroidery hoop or something similar. [You can also make your own round shapes with pipe cleaners or a wire clothing hanger.] Cut your fabric into strips measuring about 1 inch by 7 inches long. It doesn't need to be precise (isn't this project getting better and better?!). I recommend at least 35 strips for a 3.5 inch mason jar lid.
Step 2. Take one strip of fabric and tie a double knot around your hoop. Continue adding and tying fabrics until you have filled the hoop.
Step 3. Once you have filled the hoop (I used about 35-40 strips for my mason jar lids), turn the knots so they are all facing the front of the hoop. The back of your hoop should look like the photo above. Fluff the fabric, add a ribbon or bow to hang and that's it!
I think these would look great in classic colors as well as modern colors. You could use them as decorations for gift wrapping as I've done below, decorate a tree (but of course), add some bells and use as a festive door hanger, and even use them as napkin rings for an elegant table setting. The possibilities are endless.
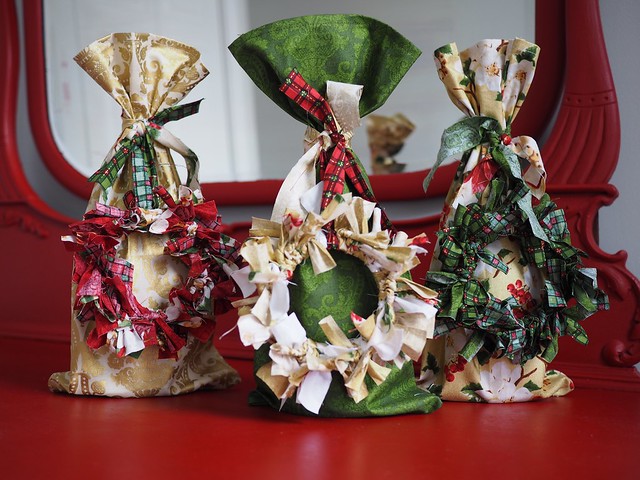
I still had a lot of fabric left over after completing these ornaments so I decided to whip up some quick fabric gift bags. I simply took squares of fabric measuring about 16 inches. I hemmed one side of the square. Then I folded the fabric in half and sewed the side and bottom using a french seam for a completed look (Here is a great tutorial on sewing french seams.) Fill the bags with treats or a bottle of wine, tie with a strip of fabric or ribbon, add a mini wreath ornament and you have a quick, easy and beautiful gift.
These would make great hostess, white elephant, and teacher gifts.
For this project, I used Christmas Tidings by Rosemarie Lavin for Windham fabrics. This is a classic Christmas collection featuring deep greens, reds, and metalic golds. Would you like to win a fat quarter bundle of this classic collection to make your own ornaments? Simply comment on this post telling me what your holiday sewing plans are this year. I'll pick a winner at the end of the week. Be sure to check out the Windham blog this week for other stops on the Windham Christmas in July blog hop tour!
Happy sewing!